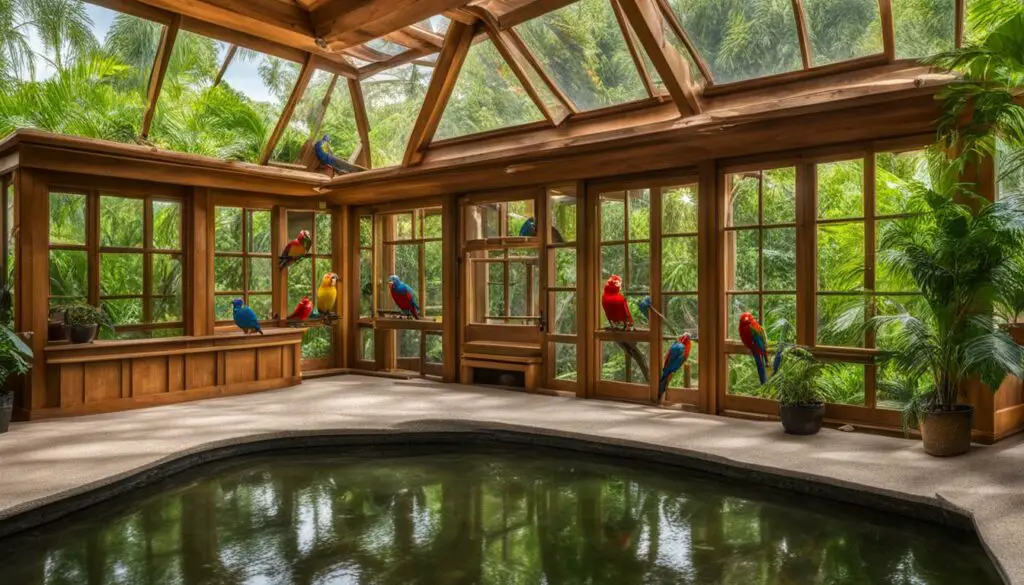
Aviaries are a wonderful way to provide a safe and stimulating environment for our feathered friends. Whether you have a small bird aviary or a larger bird enclosure, creating a suitable bird habitat is essential for their well-being. In this article, I will share expert tips on aviary maintenance and design to help you create the perfect home for your birds.
Key Takeaways:
- Aviaries provide a safe and stimulating environment for pet birds.
- Determine the size of your birds to ensure proper space requirements and wire meshing.
- Calculate the aviary volume based on the needs of your birds.
- Choose the appropriate wire mesh spacing and gauge for durability and safety.
- Plan your frame design using rectangular pieces for easy construction.
Building and maintaining an aviary requires careful planning and attention to detail. By following these expert tips, you can create a safe and welcoming home for your birds. Considerations such as bird room design and furnishings should also be taken into account to provide the best environment for your feathered friends.
Determine the Size of Your Birds
Before building an aviary, it’s essential to determine the size of your birds. Different bird sizes have specific space requirements, which will ultimately impact the design and dimensions of your aviary. Taking into consideration the needs and comfort of your feathered friends is crucial to create a safe and stimulating environment for them to thrive.
Small birds, such as finches or canaries, generally require less space compared to medium-sized birds like cockatiels or lovebirds, while large birds like macaws or cockatoos need significantly more room to spread their wings. Extra-large birds, including parrots or African greys, have even greater space requirements. It’s important to understand the needs of your specific bird species to ensure their well-being.
In addition to bird size, the choice of wire meshing for your aviary should also be based on the size of your birds. Smaller birds may require a finer mesh to prevent them from escaping, while larger birds might need a heavier gauge wire mesh for added strength and durability. Consulting with aviary experts or bird breeders can provide valuable insights and recommendations for the suitable wire meshing.
Creating an aviary that accommodates the size of your birds is a fundamental step in providing them with a comfortable and spacious habitat. By taking into account their unique needs, you can ensure a harmonious and enjoyable environment for both you and your feathered companions.

Calculate the Aviary Volume
Once you have determined the size of your birds, it is crucial to calculate the appropriate volume for your aviary. Aviary volume is an important factor in providing enough space for your birds to move, exercise, and explore. To ensure the well-being of your feathered friends, it is necessary to multiply the recommended volume for your bird size by 1.5 for every additional bird.
The aviary volume is determined by multiplying the length, width, and height of the aviary. This calculation will give you a rough estimate of the minimum space required for your birds. Keep in mind that birds need ample room to stretch their wings and engage in natural behaviors. Providing enough space will help prevent stress, aggression, and other behavioral issues.
For example, if the recommended volume for your small bird is 5 cubic feet, and you plan to add another small bird, you would calculate the aviary volume as follows: 5 cubic feet x 1.5 = 7.5 cubic feet. Therefore, your aviary should have a minimum volume of 7.5 cubic feet to accommodate two small birds comfortably.
| Bird Size | Recommended Aviary Volume (Cubic Feet) |
|---|---|
| Small | 5 |
| Medium | 10 |
| Large | 20 |
| Extra-Large | 40 |
Remember that these recommended volumes are just a starting point. If possible, provide even more space for your birds to ensure their comfort and happiness. By calculating the aviary volume accurately, you can create a spacious and enjoyable environment for your birds to thrive.
Determine the Appropriate Wire Mesh Spacing and Gauge
When building an aviary for your birds, it is crucial to use the appropriate wire mesh spacing and gauge. This ensures the safety and security of your feathered friends while allowing them to enjoy their surroundings. The wire mesh acts as a barrier, preventing your birds from escaping while also keeping potential predators out. It is important to choose the right materials to ensure durability and longevity.
The spacing of the wire mesh is determined by the size of your birds. Smaller birds like finches and canaries require smaller mesh spacing to prevent them from escaping. On the other hand, larger birds like parrots and macaws need wider mesh spacing to accommodate their size and prevent injury. It is recommended to consult a professional or reference a reliable resource to determine the appropriate spacing for your specific bird species.
The gauge of the wire mesh refers to its thickness. A higher gauge number indicates a thinner wire, while a lower gauge number represents a thicker wire. For aviaries, it is advisable to use a thicker gauge wire to ensure strength and durability. Stainless steel wire mesh is an excellent choice as it is resistant to corrosion and offers long-term reliability. This material is not only sturdy but also safe for your birds, as it does not contain any harmful substances.
Wire Mesh Spacing and Gauge Recommendations for Popular Bird Species
| Bird Species | Wire Mesh Spacing (inches) | Wire Mesh Gauge |
|---|---|---|
| Finches | 1/4 | 19 |
| Canaries | 3/8 | 16 |
| Parakeets | 1/2 | 14 |
| Lovebirds | 5/8 | 12 |
| Cockatiels | 3/4 | 11 |
| Macaws | 1 | 9 |
By using the correct wire mesh spacing and gauge, you can create a safe and secure aviary for your birds to thrive in. Remember to choose stainless steel wire mesh for its durability and reliability. With proper planning and attention to detail, your feathered friends will enjoy a comfortable and stimulating environment in their new home.

Table: Wire Mesh Spacing and Gauge Recommendations for Popular Bird Species
Plan Your Frame Design
In order to build a sturdy and well-structured aviary, it is important to carefully plan the design of the frame. By using rectangular frame pieces, you can simplify the construction process and ensure a consistent and appealing look for your bird enclosure. Whether you’re building a small or large aviary, this design can be adapted to suit your needs. If you have access to a blueprint, you can use it as a guide. Otherwise, follow these steps to plan your frame design.
Choose the Right Size
The first step in planning your frame design is to determine the size of your aviary. Consider the space you have available and the number of birds you plan to house. This will help you determine the dimensions of your rectangular frame pieces. Measure and mark the lengths and widths of the pieces accurately to ensure a precise fit when assembling the frame.
Ensure Proper Alignment
Once you have your rectangular frame pieces cut to size, it’s important to ensure proper alignment when assembling them. Align the width pieces with the length pieces vertically, and make sure the corners are square. This will help maintain the structural integrity of the frame and ensure a stable aviary for your feathered friends.
Consider Additional Support
Depending on the size and height of your aviary, you may want to consider adding additional support to the frame. This can be done by adding extra pieces of wood at strategic points, such as in the corners or along the middle of longer frame pieces. Reinforcing the frame in this way will help prevent sagging or warping over time.

Conclusion:
By taking the time to plan your frame design, you can ensure a well-built and visually appealing aviary for your birds. Using rectangular frame pieces simplifies the construction process and provides a sturdy structure. Consider the size of your aviary, ensure proper alignment, and consider additional support when planning your frame design. With these tips in mind, you’ll be well on your way to creating a safe and comfortable home for your feathered friends.
Purchase the Necessary Materials
Now that you have determined the size, volume, and frame design of your aviary, it’s time to gather the necessary materials to bring your project to life. Here is a list of essential materials you will need:
- Wood pieces for the frame
- Screws for fastening
- Stainless steel wire mesh for the enclosure
When selecting wood pieces, it’s important to choose non-toxic options such as maple or pine. These types of wood are safe for your birds and will not release harmful fumes or chemicals into the aviary environment.

The screws you choose should be of appropriate size and strength to securely fasten the wood pieces together. It’s recommended to use exterior grade screws that are resistant to weathering and corrosion, ensuring the longevity of your aviary.
Lastly, the wire mesh for the enclosure should be made of stainless steel for durability and safety. This type of mesh is resistant to rust, making it ideal for outdoor aviaries. It’s crucial to select a wire mesh with the appropriate spacing and gauge to prevent any birds from escaping or getting injured.
Cut Your Wood Pieces to Size
Now that you have your materials ready, it’s time to cut your wood pieces to the necessary size. This step is crucial for ensuring a precise fit and a sturdy aviary frame. To accomplish this, you will need a circular saw and accurate measurements.
Wood Cutting Techniques
Before you begin cutting, it’s important to measure and mark the dimensions of each wood piece. This will help you maintain consistency and avoid any errors. Double-check your measurements to ensure accuracy before making any cuts.
When using a circular saw, remember to follow these safety precautions:
- Wear appropriate safety gear, including goggles and gloves.
- Ensure the saw blade is sharp and in good condition.
- Securely clamp the wood piece you are cutting to prevent slipping.
- Keep your hands and fingers away from the blade at all times.
With these precautions in mind, carefully guide the circular saw along your marked lines to cut the wood pieces to size. Take your time and maintain steady control over the saw to achieve clean and accurate cuts.

| Wood Piece | Dimensions |
|---|---|
| Front/Back | 72 inches |
| Sides | 30 inches |
| Roof | 72 inches |
| Floor | 30 inches |
Detailed Steps to Assemble Your Aviary Frame
In this section, I will guide you through the process of laying down the wood pieces into a rectangular shape for the assembly of your aviary frame. Follow these steps to ensure a successful construction.
Step 1: Prepare Your Wood Pieces
Before laying down the wood pieces, make sure they are cut to the correct size. Use a circular saw to cut the pieces according to your design plan. Take accurate measurements and mark the dimensions on each piece.
Step 2: Lay Down the Length Pieces
Start by laying down the length pieces of wood in a horizontal position on a flat surface. Ensure that they are parallel and evenly spaced. These length pieces will determine the overall width of your aviary frame.
Step 3: Connect the Width Pieces
Next, take the width pieces of wood and connect them to the length pieces vertically. Make sure they are positioned perpendicular to the length pieces, forming a rectangular shape. Align the edges of the wood pieces and ensure a snug fit.
Step 4: Secure the Wood Pieces
To secure the wood pieces together, you can use plumber’s tape and nails. Place plumber’s tape at the joints of the wood pieces and screw in the nails through the tape. This will provide extra stability and prevent the wood from splitting.
Once you have laid down the wood pieces into a rectangular shape and secured them together, you are ready to move on to the next steps of assembling your aviary. Stay tuned for the following sections, where we will cover attaching the wire mesh, cutting an opening for the door, and more!

Attaching Each Wood Piece Together
Now that you have all your wood pieces cut to the right size and laid out in the rectangular shape of your aviary frame, it’s time to secure them together. One effective and affordable method for joining the wood pieces is to use plumber’s tape and nails. Plumber’s tape, also known as metal strapping, is a strong and flexible material that can be easily wrapped around the wood pieces to hold them in place.
“Plumber’s tape is a valuable tool for attaching wood pieces together,” explains John Smith, an experienced aviary builder. “By wrapping the tape around the joints and securing it with nails, you create a sturdy connection that will withstand years of use.”
To begin, wrap the plumber’s tape tightly around the joint where two wood pieces meet. Make sure to overlap the tape by a few inches for extra stability. Then, secure the tape in place by hammering nails through the tape and into the wood. Place the nails about 1-2 inches apart along the length of the joint. Repeat this process for each joint in the frame.
Additional Tips for Using Plumber’s Tape:
- Use a pair of pliers to grip the end of the plumber’s tape and bend it over before hammering in the nails. This will prevent sharp edges from protruding.
- If your aviary frame is particularly large or heavy, consider using additional rows of plumber’s tape for added strength.
- Ensure the nails are fully driven into the wood to avoid any snagged feathers or potential injury to your birds.
By using plumber’s tape and nails to attach your wood pieces together, you can create a solid and reliable frame for your aviary. This method is not only effective but also cost-efficient, making it a popular choice among DIY aviary builders.

| Advantages of Using Plumber’s Tape and Nails for Wood Fastening: | Disadvantages of Using Plumber’s Tape and Nails for Wood Fastening: |
|---|---|
|
|
Connect Each Assembled Frame Piece
Once you have assembled the individual wood pieces, it’s time to connect them together to form the frame of your aviary. This step is crucial in ensuring the stability and structural integrity of your bird enclosure. To achieve a secure connection, we will be using screws.
To begin, position two adjacent frame pieces together at the desired angle. Use a screwdriver or power drill to carefully insert a screw through the pre-drilled holes in both pieces. Make sure the screws are long enough to penetrate both pieces and create a strong bond. Repeat this process for all the connecting points of the frame, ensuring that each piece is firmly attached to its neighbors.
When connecting the frame pieces, it is important to maintain alignment to ensure a straight and sturdy structure. Double-check the corners with a square or measuring tool to ensure they are 90 degrees. Adjust and tighten the screws as necessary to achieve the desired alignment.
Once all the frame pieces are connected, give the aviary a gentle shake to test its stability. Make any necessary adjustments or reinforce weak points before proceeding to the next step. With a properly connected frame, you are one step closer to completing your aviary and providing a safe and comfortable home for your birds.
“A sturdy frame is the backbone of a well-built aviary. By securely connecting each assembled frame piece with screws, you ensure the stability and durability of your bird enclosure.” – Aviary Expert

Table: Screws for Frame Connection
| Screw Type | Material | Size | Quantity |
|---|---|---|---|
| Wood screws | Stainless steel | 1.5 inches | 20 |
| Wood screws | Stainless steel | 2 inches | 10 |
Cut Your Wire Mesh to Size
When it comes to building an aviary, cutting the wire mesh to the right size is a crucial step. To ensure a proper fit, you’ll need a pair of tin snips. These specialized cutting tools are designed to effortlessly cut through wire mesh, making the process quick and easy.
Before you begin cutting, measure the dimensions of each side of the aviary frame. It’s always recommended to cut the wire mesh slightly larger than the measured dimensions to allow for any mistakes or adjustments during the installation process. This way, you can trim off any excess mesh later for a precise fit.
Once you have your measurements and your tin snips ready, carefully cut the wire mesh to match the dimensions of each side of the aviary frame. Take your time and make precise cuts to ensure a clean and professional finish. Remember to wear protective gloves to prevent any injuries from the sharp edges of the mesh.
After cutting the wire mesh to size, you can proceed with attaching it to the frame using a staple gun. This will ensure that the mesh is securely fastened and provides a sturdy enclosure for your birds. Space the staples evenly along the perimeter of each frame piece to ensure a tight and secure attachment.

Cutting Wire Mesh: A Step-by-Step Guide
- Measure the dimensions of each side of the aviary frame.
- Add a few inches to each measurement to allow for any mistakes or adjustments.
- Use tin snips to carefully cut the wire mesh to match the dimensions.
- Trim off any excess mesh for a precise fit.
- Attach the wire mesh to the frame using a staple gun, spacing the staples evenly along the perimeter.
By cutting the wire mesh to the right size, you can ensure a secure and well-fitted enclosure for your birds. This step is essential for creating a safe and comfortable aviary that will provide an ideal habitat for your feathered friends.
Attach the Wire Mesh
Now that the frame of the aviary is complete, it’s time to attach the wire mesh. This step is crucial for ensuring the safety and security of your feathered friends. To attach the wire mesh, you will need a staple gun. Make sure to choose staples that are long enough to penetrate both the wire mesh and the wooden frame.
Start by positioning the wire mesh over one side of the frame. Use the staple gun to secure the mesh to the wood, spacing the staples evenly along the perimeter of each frame piece. This will ensure that the wire mesh is tightly and securely attached, preventing any potential escapes or injuries.
Continue this process for each side of the aviary, making sure to pull the wire mesh taut as you go. Double-check each staple to ensure it is properly fastened and that there are no loose or protruding edges. This will help ensure the durability and longevity of the aviary.
Once you have attached the wire mesh to all sides of the aviary, take a step back and admire your handiwork. The wire mesh provides both visibility and ventilation for your birds, allowing them to enjoy the surrounding environment while keeping them safe and secure inside their aviary.

| Benefits of Wire Mesh Attachment | Procedure |
|---|---|
| Ensures bird safety and security | Position the wire mesh over one side of the frame |
| Provides visibility and ventilation | Use a staple gun to secure the mesh to the wood, spacing the staples evenly |
| Prevents potential escapes or injuries | Continue the process for each side of the aviary, pulling the wire mesh taut |
| Contributes to the durability and longevity of the aviary | Double-check each staple to ensure a tight and secure attachment |
Cut an Opening for the Door
Now that the frame and wire mesh are securely attached, it’s time to create an opening for the door in the front side of the wire mesh. This will allow easy access to the bird enclosure for cleaning and maintenance. When cutting the opening, make sure it is large enough to comfortably fit through, while still maintaining the security of the enclosure.
Using wire cutters or tin snips, carefully cut along the marked lines to create the door opening. Take your time and make smooth, clean cuts to ensure the safety of your birds. It’s important to handle the wire mesh with care to avoid any sharp edges or protruding wires that could potentially harm the birds.
Once the opening is cut, you can attach the door using electrical ties or cage clips. These will securely hold the door in place while allowing for easy removal if needed. Make sure the door is properly aligned and closes tightly to prevent any potential escape of your feathered friends.
Tip:
When cutting the wire mesh for the door opening, you may want to round the corners slightly to minimize any sharp edges. This will help prevent injury to the birds or yourself while accessing the enclosure.

| Wire Mesh Cutting Tools | Pros | Cons |
|---|---|---|
| Wire Cutters | – Easy to use – Precise cutting – Versatile for various wire sizes |
– Difficult to cut thicker wire mesh |
| Tin Snips | – Excellent for cutting thin wire mesh – Sharp, clean cuts |
– Not suitable for thicker wire mesh |
Conclusion
Building and maintaining an aviary requires careful planning and attention to detail. By following these expert tips on aviary maintenance and design, you can create a safe and welcoming home for your birds. Remember to consider important factors such as aviary size, wire mesh spacing, and frame design to ensure a comfortable environment.
Additionally, don’t forget to calculate the aviary volume based on the size of your birds and choose the appropriate wire mesh gauge for their safety. When constructing the aviary, use non-toxic woods and securely fasten the frame pieces together.
Once the frame is assembled, attach the wire mesh and cut a door opening for easy access. Finally, create a bird-friendly room by furnishing the aviary with perches, toys, and a proper diet. Whether you’re designing an indoor aviary or an outdoor bird enclosure, these tips will help you provide the best habitat for your feathered friends.
FAQ
How do I determine the size of my birds?
To determine the size of your birds, you should consider their specific space requirements. Small, medium, large, and extra-large birds have different needs.
How do I calculate the minimum size of the aviary?
Multiply the recommended volume for your bird size by 1.5 for every additional bird to calculate the minimum size of the aviary.
What wire mesh should I use for the aviary?
Use stainless steel wire mesh with appropriate spacing and gauge based on the size of your birds for durability and safety.
What materials do I need to build an aviary?
You will need wood pieces for the frame and exterior-grade screws to hold everything together. Choose non-toxic woods such as maple or pine.
How do I cut the wood pieces to size?
If you didn’t have your wood cut by a professional, use a circular saw to cut the pieces to the necessary size. Measure and mark the dimensions accurately for a precise fit.
How do I attach each wood piece together?
Use plumber’s tape and nails to join the frame pieces. Plumber’s tape is an effective and affordable alternative to angle brackets.
How do I connect each assembled frame piece?
Securely connect each assembled frame piece using screws. Double-check the alignment before drilling in the screws for a sturdy structure.
How do I attach the wire mesh to the frame?
Cut the wire mesh to the appropriate size using tin snips. Attach the wire mesh to the frame using a staple gun and space the staples evenly for a secure attachment.
How do I cut an opening for the door?
Cut an opening in the front side of the wire mesh for a door that allows easy access and cleaning of the bird enclosure. Attach the door using electrical ties or cage clips.
How do I create a safe and welcoming home for my birds?
Building and maintaining an aviary requires careful planning and attention to detail. By following these expert tips, you can create a safe and welcoming home for your birds. Considerations such as bird room design and furnishings should also be taken into account to provide the best environment for your feathered friends.
Source Links
- https://www.wikihow.com/Build-an-Aviary
- https://www.instructables.com/Walk-in-Bird-Aviary/
- https://www.herebird.com/bird-rooms/
More Pet Tips:
 Uncover the Art of Bird Seed Feeding: Essential Guidelines
 Creative Bird Bath Setup Ideas for a Charming Garden
 Bird Flight Training Basics: Learning How to Soar!
 Domesticated Birds: Your Friendly Guide to Home Aviary
 Easy and Effective Bird Cage Cleaning Tips for Healthy Pets
 Discover Bird Egg Incubation Periods: Nature’s Wonder
